Payments & gateways
Yatra's free plugin includes PayPal and Pay Later as fully-working gateways. The other seven — Stripe, Razorpay, Mollie, Paystack, Square, Authorize.Net, Bank Transfer — are part of Yatra Pro.
New to payment gateways?
Each gateway below has a Before you start → Get your keys → Paste in Yatra → Test it flow. Follow the steps in order, paste the values into the matching field in Yatra → Settings → Payment, and you'll have a working checkout in under 10 minutes per gateway.
What's included
| Gateway | Free | Pro | Slug (in source) | Where it shines |
|---|---|---|---|---|
| PayPal | ✅ | ✅ | paypal | Globally trusted; Simple (email + IPN) and Advanced (REST) modes. |
| Pay Later | ✅ | ✅ | pay_later | Pay-on-arrival / wire transfer / cash workflow. |
| Stripe | — | ✅ | stripe | Cards + Apple Pay / Google Pay, scheduled balance payments. |
| Razorpay | — | ✅ | razorpay | India: cards, UPI, netbanking, wallets. |
| Mollie | — | ✅ | mollie | Europe: iDEAL, Bancontact, SEPA, cards. |
| Paystack | — | ✅ | paystack | Africa-first; cards, transfers, mobile money. |
| Square | — | ✅ | square | NA / UK / AU / JP cards. |
| Authorize.Net | — | ✅ | authorize_net | US-centric merchant accounts. |
| Bank Transfer | — | ✅ | bank_transfer | Manual settlement; bank details on confirmation. |
Where to configure
Open Yatra → Settings → Payment.
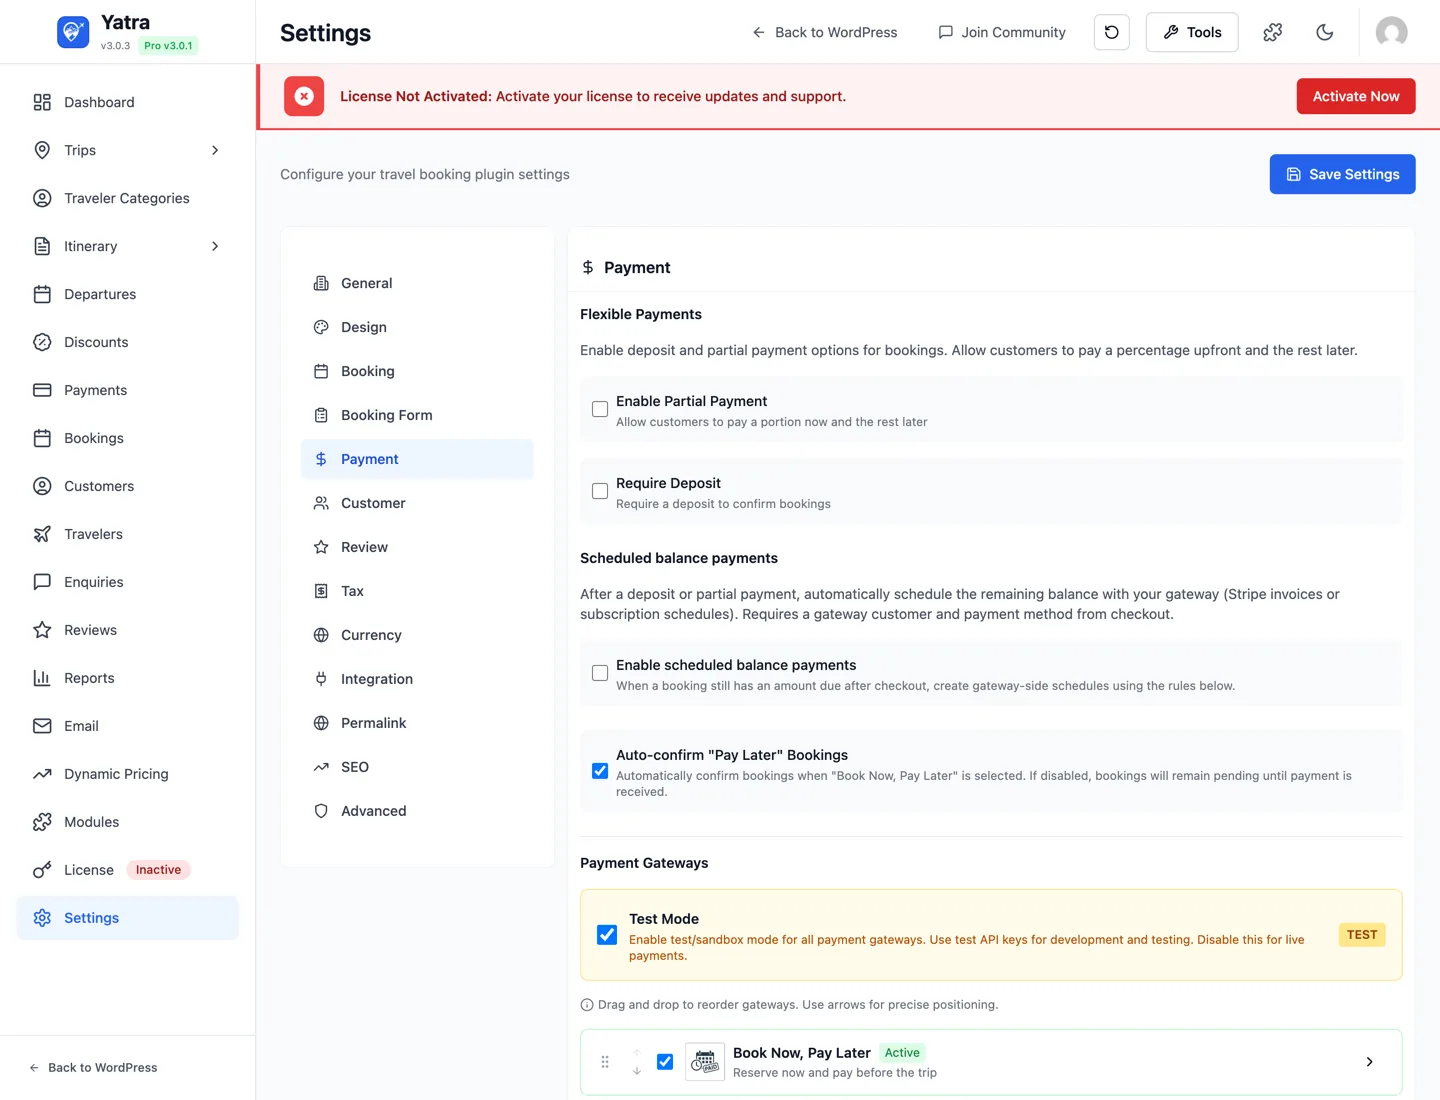
The screen has these sections:
- Global — master Test mode switch and Auto-confirm Pay Later bookings.
- Partial / Deposit / Scheduled payments — Pro-only flows (see Settings → Payment for every field).
- Gateways — every gateway as a card with an Enable toggle and a Settings disclosure. Pro-only gateways display a PRO badge until you have an active license.
One Test Mode switch for all gateways
A single setting — yatra_payment_test_mode (default true) — drives test mode for every gateway. Each gateway stores both live_* and test_* key pairs and Yatra picks the active pair from this flag. There's no per-gateway test toggle in the current UI.
Currency
Configured under Settings → Currency — see Settings → Currency. The currency code is global; multi-currency at checkout is a Pro module.
PayPal (free)
PayPal is the most widely-recognised gateway and is the simplest to set up. Yatra offers two modes — start with Simple for testing, upgrade to Advanced (REST) when you go live.

Before you start
- You'll need a PayPal Business account: https://www.paypal.com/business.
- For test mode, also sign up for the free PayPal Developer Sandbox: https://developer.paypal.com/dashboard/accounts.
Mode A — Simple (email + IPN)
Easiest to set up. You only need your PayPal business email. Good for low-volume / trial use.
Step 1: Note your PayPal email. It's the email you used to sign up for your PayPal Business account.
Step 2: Paste in Yatra.
| Yatra field | Where it goes |
|---|---|
| Mode | Select Simple (email + IPN). |
| PayPal email | Your PayPal Business email. |
Step 3: Save, then enable PayPal at the top of the panel and click Save Settings.
PayPal will POST IPN notifications to https://yoursite.com/wp-json/yatra/v1/payment/webhook/paypal-ipn after each transaction — no manual webhook setup needed in Simple mode.
Mode B — Advanced (REST)
Full webhook support and the basis for scheduled / partial payments. Requires a REST app in your PayPal Developer dashboard.
Step 1: Create a REST app.
- Sign in at https://developer.paypal.com/dashboard/applications.
- Click Apps & Credentials → flip the Sandbox / Live toggle to Live when you're ready (start with Sandbox).
- Click Create App, name it
Yatra YOUR-SITE, pick your business account, save.
Step 2: Copy the credentials.
On the app page you'll see:
- Client ID — long alphanumeric string.
- Secret — click Show to reveal.
Keep the page open — you'll need both in a moment.
Step 3: Paste in Yatra.
| Yatra field | Where it goes |
|---|---|
| Mode | Select Advanced (REST). |
| Client ID | The Client ID from the developer app page. |
| Client Secret | The Secret value (click Show in the PayPal dashboard to reveal). |
Step 4: Save, then enable PayPal, click Save Settings.
There's no "Webhook ID" field
Earlier doc revisions asked for a "Webhook ID" — that field does not exist in PayPalGateway::getConfigFields(). PayPal verification is handled internally based on Client ID / Secret.
Test it
- Confirm global Test mode is on under Settings → Payment → Global.
- If using Advanced REST, switch your PayPal app to Sandbox and use sandbox-account credentials.
- Book a trip on the front-end → choose PayPal at checkout.
- Pay with a sandbox personal account (PayPal creates one automatically; password is in your dev dashboard).
- Return to your site — booking should flip to Confirmed, payment to Completed.
Useful links
- PayPal Developer Dashboard: https://developer.paypal.com/dashboard/applications
- Sandbox test accounts: https://developer.paypal.com/dashboard/accounts
- PayPal pricing: https://www.paypal.com/business/fees
Pay Later (free)
Not a real payment gateway — it lets customers reserve a booking now and pay later via cash, wire transfer, or cheque. Useful for travel agents with a deposit + balance workflow.

How to configure
| Yatra field | Setting ID | Default | What to put |
|---|---|---|---|
| Payment deadline (days) | payment_deadline_days | 7 | Days after booking by which the customer must pay. Shown on the confirmation page and reminder email. |
| Auto-cancel after (days) | auto_cancel_days | 14 | Unpaid bookings older than this are auto-cancelled by the cron. Set 0 to disable auto-cancel. |
| Require deposit at booking | require_deposit | false | When on, the customer must pay a deposit through a real gateway before the Pay Later flow activates. |
| Deposit amount | deposit_amount | 0 | Currency amount required as deposit when Require deposit is on. |
| Payment reminder (days before) | reminder_days | 3 | How many days before the deadline to email the Payment due reminder. |
Auto-confirm
The Settings → Payment → Auto-confirm Pay Later bookings checkbox (under the Global section) skips the Pending state — useful when you're comfortable confirming on trust.
When customers pick Pay Later at checkout, Yatra creates a Pending booking. Once you've received the money, mark the payment Completed in Yatra → Payments.
Stripe PRO
Yatra Pro includes Stripe with first-class checkout integration plus support for the Scheduled Payments module — auto-charge the balance on a future date.
Unlock Stripe →
Before you start
- Sign up at https://stripe.com — free, no credit card needed for test mode.
- To go live you'll need to verify your business (Stripe walks you through it after sign-up).
Step 1 — Get your API keys
Stripe has separate test and live keys. Yatra stores both pairs and the global Test mode flag picks which is active. Generate both.
- Open https://dashboard.stripe.com/test/apikeys (test mode).
- You'll see:
- Publishable key — starts with
pk_test_…. Visible by default — copy it. - Secret key — starts with
sk_test_…. Click Reveal → copy it.
- Publishable key — starts with
- Now flip to live mode at the top-right and open https://dashboard.stripe.com/apikeys.
- Repeat: copy
pk_live_…andsk_live_….
Restricted keys
For tighter security in production you can use a restricted key (rk_live_…) instead of the secret key. It works as long as you grant it Read+Write on Payment Intents, Charges, Refunds, Webhook Endpoints, and Customers.
Step 2 — Create a webhook
- In Yatra → Settings → Payment → Stripe, copy the Webhook Endpoint URL shown in that panel (use the Copy button). It is pre-filled for your site, e.g.
https://yoursite.com/wp-json/yatra/v1/payment/webhook/stripe. - Click the Open Stripe → add this endpoint link next to it (it opens the Test or Live webhooks screen to match your current mode), or go to https://dashboard.stripe.com/webhooks (
/test/webhooksfor test). - Click + Add endpoint and paste the URL as the Endpoint URL.
- Listen to events — pick Select events and tick at minimum:
payment_intent.succeededpayment_intent.payment_failedcharge.refunded
- Click Add endpoint.
- On the endpoint detail page, find Signing secret → click Reveal → copy the
whsec_…value. - Paste it into the Webhook Secret field in Yatra. Create the endpoint in the same mode (Test/Live) as your API keys — test and live have separate endpoints and separate
whsec_secrets.
Step 3 — Enable payment methods (optional)
By default Stripe only enables card payments. To add Apple Pay / Google Pay / Klarna / etc.:
- Open https://dashboard.stripe.com/settings/payment_methods.
- Toggle on the methods you want.
- Most need domain verification (Stripe shows the steps inline).
Step 4 — Paste in Yatra
| Yatra field | Setting ID | Where it comes from |
|---|---|---|
| Publishable Key | api_key | pk_live_… (or pk_test_… in Test Mode) from step 1. |
| Secret Key | api_secret | sk_live_… (or sk_test_… in Test Mode) from step 1. |
| Webhook Endpoint URL | webhook_url | Read-only, pre-filled for your site. Copy it into Stripe (step 2). |
| Webhook Secret | webhook_secret | whsec_… from step 2 — required since Yatra Pro 3.0.4. |
| Enabled Payment Methods | enabled_methods | Multi-select. Tick the methods you enabled in step 3 (default: Card). |
Keys must match the mode — or the card is never charged
Stripe has one Publishable/Secret pair, and a global Test Mode toggle (Settings → Payment → Test Mode) decides test vs live. Enter the keys for the mode you're in:
- Test Mode ON →
pk_test_…+sk_test_… - Test Mode OFF (live) →
pk_live_…+sk_live_…
If Test Mode is off but you paste a pk_test_ / sk_test_ key (a very common mistake), Stripe runs in test mode on your live site and real cards are never charged even though the booking completes. The publishable and secret keys must both be the same mode.
Step 5 — Test it
- Confirm global Test mode is on.
- Book a trip → pick Stripe at checkout.
- Use Stripe's test card:
4242 4242 4242 4242· any future expiry · any 3-digit CVC. - Verify the booking shows Confirmed, payment Completed, and the receipt email arrives.
- Refund from the Stripe dashboard to make sure the webhook flips the payment to Refunded in Yatra.
Webhook secret is required (3.0.4+)
The Stripe webhook handler rejects any event that lacks a valid Stripe-Signature header. Without the Webhook signing secret, webhook deliveries fail and the booking updates only via the synchronous return-to-site flow.
Signature verification is HMAC-SHA256 over {timestamp}.{raw-body} with a 5-minute replay window — the same scheme as Stripe's official PHP SDK.
Useful links
- Stripe Dashboard → API keys: https://dashboard.stripe.com/apikeys
- Stripe Dashboard → Webhooks: https://dashboard.stripe.com/webhooks
- Stripe test cards: https://docs.stripe.com/testing#cards
- Stripe pricing: https://stripe.com/pricing
Razorpay PRO
Popular in India — supports cards, UPI, netbanking, and wallets in INR.

Before you start
- Sign up at https://razorpay.com/ — Indian business (Indian bank account + KYC required to receive INR payouts).
- Razorpay has a built-in test mode; no separate sandbox account needed.
Step 1 — Get your API keys
- Sign in at https://dashboard.razorpay.com/.
- From the left sidebar pick Account & Settings → API Keys (or open https://dashboard.razorpay.com/app/keys).
- Click the test/live toggle at the top right.
- Click Generate Test Key (or Generate Live Key). A modal shows:
- Key ID — starts with
rzp_test_…orrzp_live_…. Visible. - Key Secret — shown once. Copy and save it now; Razorpay will never show it again.
- Key ID — starts with
- Repeat for the other mode if you want both.
Step 2 — Configure the webhook (optional but recommended)
Async webhook is helpful because the redirect-back can fail (browser closed, mobile network drop, etc.). Razorpay still confirms via webhook.
- Open Account & Settings → Webhooks (https://dashboard.razorpay.com/app/webhooks).
- Click + Add New Webhook.
- Webhook URL:
https://yoursite.com/wp-json/yatra/v1/payment/webhook/razorpay - Active Events: tick at least
payment.captured,payment.failed,refund.processed. - Secret: leave blank for now (Yatra verifies via Key Secret in this version).
- Save.
Step 3 — Paste in Yatra
| Yatra field | Setting ID | Notes |
|---|---|---|
| Key ID | key_id | rzp_test_… or rzp_live_… from step 1. |
| Key Secret | key_secret | Paired secret from step 1. |
Test it
Razorpay's test mode accepts the test card 4111 1111 1111 1111, any future expiry, any CVC.
Useful links
- Razorpay Dashboard: https://dashboard.razorpay.com/
- API Keys page: https://dashboard.razorpay.com/app/keys
- Webhooks page: https://dashboard.razorpay.com/app/webhooks
- Test cards & UPI IDs: https://razorpay.com/docs/payments/payments/test-card-upi-details/
Mollie PRO
Strong in Europe (Netherlands, Belgium, Germany, France) — iDEAL, Bancontact, SEPA, cards.

Before you start
- Sign up at https://www.mollie.com/ — European business with a European bank account.
- Mollie's test mode is built into your live account (toggle in the dashboard header).
Step 1 — Get your API key
- Sign in at https://my.mollie.com/dashboard/.
- In the dashboard header switch to Test mode (left) or Live mode (right) — Mollie shows separate keys for each.
- From the left sidebar pick Developers → API keys (or open https://my.mollie.com/dashboard/developers/api-keys).
- Copy the appropriate key:
- Test API key — starts with
test_…. - Live API key — starts with
live_…. Required for production.
- Test API key — starts with
Mollie auto-detects the mode
Unlike Stripe, Mollie has one key per mode, and Mollie itself reads the test_ / live_ prefix to decide what mode to run in. You only paste ONE key into Yatra — and you swap it manually when you go live.
Step 2 — Activate payment methods
- Open https://my.mollie.com/dashboard/settings/profiles.
- For each profile, click Payment methods and tick the ones you want (iDEAL, Bancontact, SEPA, credit card, etc.).
- Some methods need extra verification (e.g. Apple Pay needs domain verification).
Step 3 — Paste in Yatra
| Yatra field | Setting ID | Notes |
|---|---|---|
| API key | api_key | The test_… or live_… key from step 1. Mollie auto-detects the mode from the prefix. |
| Webhook URL | webhook_url | Auto-populated to https://yoursite.com/wp-json/yatra/v1/payment/mollie/webhook. Only change this if your site sits behind a proxy / reverse-host. |
| Payment methods | payment_methods | Multi-select. Leave empty to offer everything you've enabled in step 2. |
Mollie needs a publicly-reachable URL
Mollie only delivers webhooks to internet-accessible URLs. On a local-dev site (yatra.local, localhost) the gateway skips sending the webhookUrl parameter; confirmation happens via the return-to-site flow only. Use an ngrok tunnel for full local testing.
Useful links
- Mollie Dashboard: https://my.mollie.com/dashboard/
- API keys page: https://my.mollie.com/dashboard/developers/api-keys
- Profiles & payment methods: https://my.mollie.com/dashboard/settings/profiles
- Test payment methods reference: https://docs.mollie.com/overview/testing
Paystack PRO
Africa-first — cards, bank transfer, USSD, mobile money. Primary in Nigeria, Ghana, Kenya, South Africa.

Before you start
- Sign up at https://paystack.com/signup.
- Paystack has a built-in test mode toggle on the dashboard — no separate sandbox sign-up needed.
Step 1 — Get your API keys
- Sign in at https://dashboard.paystack.com/.
- From the sidebar pick Settings → API Keys & Webhooks (or open https://dashboard.paystack.com/#/settings/developer).
- You'll see two pairs:
- Test Public Key (
pk_test_…) and Test Secret Key (sk_test_…). - Live Public Key (
pk_live_…) and Live Secret Key (sk_live_…) — visible only after Paystack approves your account.
- Test Public Key (
- Click Show beside each secret key, copy both pairs.
Step 2 — Configure the webhook URL
Paystack lets you set one webhook URL per environment.
- On the same Settings → API Keys & Webhooks page, scroll to Webhook URL.
- Paste
https://yoursite.com/wp-json/yatra/v1/payment/paystack/webhookfor live. - Add the test webhook URL after toggling to test mode (or use the same — Paystack signs every event with the secret key).
Step 3 — Paste in Yatra
| Yatra field | Setting ID | Notes |
|---|---|---|
| Public key | public_key | pk_live_… or pk_test_…. Toggle the right pair based on the global Test mode. |
| Secret key | secret_key | sk_live_… or sk_test_…. Used for HMAC signature verification on webhooks. |
| Webhook URL | webhook_url | Auto-populated. Only change if proxied. |
| Payment channels | payment_channels | Multi-select (cards, bank transfer, USSD, mobile money, QR, EFT). Empty = all enabled on your Paystack account. |
Useful links
- Paystack Dashboard: https://dashboard.paystack.com/
- API Keys & Webhooks: https://dashboard.paystack.com/#/settings/developer
- Test cards: https://paystack.com/docs/payments/test-payments/
- Paystack supported countries: https://paystack.com/pricing
Square PRO
US, UK, Canada, Australia, Japan. Useful when you also take in-person payments via Square's POS hardware.

Before you start
- Sign up at https://squareup.com/signup.
- For development, sign in to the Square Developer Dashboard with the same Square account: https://developer.squareup.com/apps.
Step 1 — Create a developer application
- Open https://developer.squareup.com/apps.
- Click + Create your first application (or + at the top right). Name it
Yatra YOUR-SITE. - On the application page you'll see two tabs: Sandbox and Production. Both have their own credentials.
Step 2 — Copy credentials
On the Production tab (and again on Sandbox for testing), grab:
- Application ID — starts with
sq0idp-…for production,sandbox-sq0idb-…for sandbox. - Access token — under Credentials. Click Reveal token to see it. Starts with
EAAA….
You'll also need a Location ID — Square requires charges to be tied to a physical location.
Step 3 — Find your Location ID
- Open Locations in the developer dashboard sidebar, or in your Square dashboard go to Account & Settings → Business → Locations: https://app.squareup.com/dashboard/locations.
- Each location has an ID like
LXXX1234567890. Copy the one matching the country/region you want to charge in.
Step 4 — Paste in Yatra
| Yatra field | Setting ID | Where it comes from |
|---|---|---|
| Application ID | application_id | The sq0idp-… / sandbox-sq0idb-… from the Developer app page. |
| Access token | access_token | The EAAA… token revealed on the Developer app page. |
| Location ID | location_id | The LXXX… ID from the Locations screen. |
Sandbox uses its own credentials. The global Test mode flag picks which set Yatra uses.
Useful links
- Square Developer Dashboard: https://developer.squareup.com/apps
- Locations: https://app.squareup.com/dashboard/locations
- Square pricing: https://squareup.com/us/en/pricing
- Sandbox test cards: https://developer.squareup.com/docs/devtools/sandbox/payments
Authorize.Net PRO
US-centric — popular with established merchants who already have an Authorize.Net merchant account through their acquirer.

Before you start
- You need an active Authorize.Net merchant account. Sign up at https://www.authorize.net/sign-up/.
- For development, register a free sandbox account at https://developer.authorize.net/hello_world/sandbox/.
Step 1 — Get API Login ID and Transaction Key
- Sign in to Merchant Interface: https://account.authorize.net/ (live) or https://sandbox.authorize.net/ (sandbox).
- In the left menu pick Account → Settings → Security Settings → General Security Settings → API Credentials & Keys.
- The API Login ID is shown plainly. Copy it.
- To generate a new Transaction Key:
- Select New Transaction Key.
- Click Submit — Authorize.Net emails you a verification PIN.
- Enter the PIN. The new key is shown once. Copy it immediately.
Step 2 — Get the Public Client Key
Still on API Credentials & Keys:
- Scroll to Public Client Key.
- Click Submit to generate one if it's empty.
- Copy the key. This is what Yatra uses for Accept.js to tokenize card data in the browser.
Step 3 — Paste in Yatra
| Yatra field | Setting ID | Notes |
|---|---|---|
| API Login ID | api_login_id | From step 1. |
| Transaction Key | transaction_key | From step 1. |
| Public Client Key | public_client_key | From step 2 — required for Accept.js card tokenisation. |
Sandbox URL: https://sandbox.authorize.net. The global Test mode flag flips between live and sandbox endpoints.
Useful links
- Live Merchant Interface: https://account.authorize.net/
- Sandbox Merchant Interface: https://sandbox.authorize.net/
- Sandbox sign-up: https://developer.authorize.net/hello_world/sandbox/
- Test credit cards: https://developer.authorize.net/hello_world/testing_guide.html
Bank Transfer PRO
No external account, no credentials — you just publish your bank details on the booking confirmation page. The booking is Pending until you mark it paid in Yatra → Payments.

| Yatra field | Setting ID | Notes |
|---|---|---|
| Bank name | bank_name | Displayed on the booking confirmation page. |
| Account holder name | account_name | Displayed on the booking confirmation page. |
| Account number | account_number | Displayed on the booking confirmation page. |
| Routing / SWIFT code | routing_code | IBAN, SWIFT, ABA — whichever your bank requires. Free-text. |
| Customer instructions | instructions | Free-text shown to the customer beneath the bank details. |
Stripe, Razorpay, Mollie, Paystack, Square, Authorize.Net, and Bank Transfer all unlock with a single Yatra Pro license.
Compare Yatra Pro plans →Deposits, partial & scheduled payments PRO
These three flows live above the gateway list on Settings → Payment — they apply universally regardless of which gateway the customer picks. Full schema reference: Settings → Payment.
| Flow | Key fields |
|---|---|
| Partial payment | partial_payment (toggle), partial_payment_percentage — customer pays a percentage at booking, the rest later. |
| Deposit | deposit_required (toggle), deposit_percentage — a percentage charged upfront before the booking is held. |
| Scheduled balance | enable_scheduled_payments, scheduled_payment_type (single / installments), scheduled_payment_days, scheduled_payment_installments, scheduled_payment_interval, scheduled_payment_reminder_days. |
Per-trip overrides live in the Advanced section of the Trip Builder (see Create a trip → 4.1 Advanced Settings).
The Payments admin
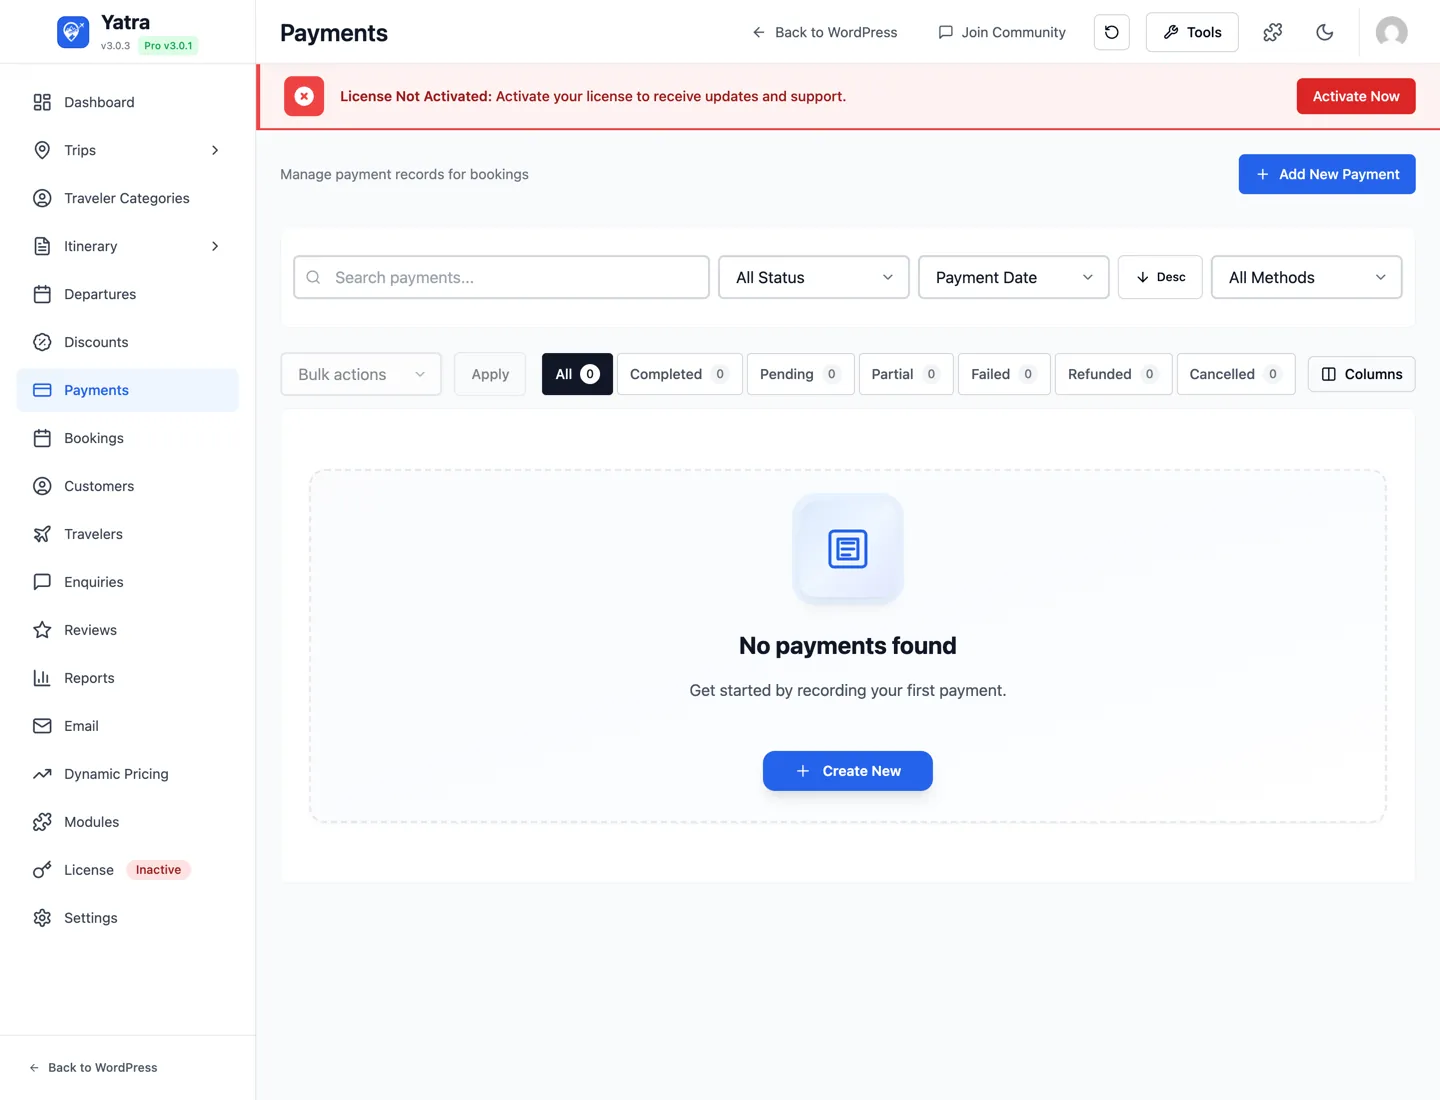
Open Yatra → Payments. You'll see every payment record across all bookings.
- Search by payment number, customer, or transaction ID.
- Status filter — All / Completed / Pending / Partial / Failed / Refunded / Cancelled.
- Method filter — filter by gateway.
- Sort — by Payment Date or Payment Number (asc / desc).
- Default columns — Payment, Customer, Booking, Amount, Method, Status, Date.
Bulk actions
Tick rows and pick:
- Mark as Completed
- Mark as Failed
- Mark as Refunded
- Mark as Cancelled
- Delete permanently
Add a payment manually

Click + Add New Payment to record an offline payment (cash, wire, cheque):
| Field | Notes |
|---|---|
| Booking | Searchable dropdown (search by booking code, customer name, or email). |
| Amount | Number with the currency's decimal places. |
| Payment Method | Select — Credit Card / Debit Card / PayPal / Bank Transfer / Cash / Check / Other. |
| Payment Date | Date picker — cannot be in the future. Default = today. |
| Transaction ID | Optional reference (TXN-12345, internal ledger ID, etc.). |
| Notes | Internal-only text. |
| Payment Status | Sidebar select — Pending / Completed / Partial / Failed / Refunded / Cancelled. Default = pending. |
Click Save Payment. The booking's Due Now updates instantly.
Refunds
| Gateway | Recommended refund flow |
|---|---|
| PayPal / Stripe | Refund in the gateway dashboard first, then mark refunded in Yatra. |
| Razorpay / Mollie / Paystack / Square / Authorize.Net | Same — gateway dashboard first, then mark refunded. |
| Pay Later / Bank Transfer | Refund manually via your bank, then mark refunded. |
To mark refunded:
- Single payment — open Payments, click the row → Edit → set Status to Refunded.
- Bulk — tick rows in the Payments list → bulk action Mark as Refunded.
When you mark refunded:
- The payment status changes to Refunded.
- The booking's payment status updates accordingly.
- An invoice download is still available (now marked refunded).
- The
yatra_payment_refundedaction fires for downstream automations.
Test mode workflow
A safe way to test any gateway:
- Confirm the global Test mode is on under Settings → Payment → Global.
- Paste sandbox / test keys into the gateway's settings card.
- Set up the gateway webhook in sandbox mode pointing to your staging URL.
- Book a trip as a fresh test customer with the gateway's test card or sandbox account.
- Verify: booking shows Confirmed, payment shows Completed, and the receipt email arrives.
- Switch the global Test mode off, paste live keys, switch the webhook to live mode, and run one small live transaction with a real card. Refund it via the gateway dashboard.
Payment-flow security model (3.0.4+)
Yatra's payment endpoints enforce three guarantees out of the box. You don't need to configure anything — these run on every checkout — but it's useful to know how they affect testing.
1. Server-authoritative amounts. When the React checkout calls POST /yatra/v1/payment/create-intent with a booking_id, Yatra ignores any amount / currency in the request body and recomputes them from the stored booking row (amount_due, currency). A tampered front-end cannot pay $1 for a $1000 trip. If the amounts disagree, Yatra forces the server value and fires the yatra_payment_amount_mismatch action so you can wire it to a fraud-monitoring tool.
2. Booking ownership. POST /yatra/v1/payment/confirm and GET /yatra/v1/payment/status/{id} require either:
- the requester is the registered user who owns the booking, or
- the requester is an administrator (
manage_options), or - the booking is a guest booking AND the request includes a matching
booking_token(the short-lived transient set during checkout).
Anonymous reads of arbitrary booking IDs return 401.
3. Idempotent payment recording. Each (booking_id, transaction_id) pair can only ever produce one row in the booking-payments table. A duplicate Stripe webhook, a re-clicked confirm button, or a parallel return-to-site + webhook race all collapse to a single payment record and a single confirmation email. Partial / deposit payments correctly accumulate amount_paid instead of being force-marked fully paid.
If you write a custom gateway, follow the same pattern by either calling \Yatra\Repositories\PaymentRepository::findByTransactionId() before inserting, or by extending AbstractPaymentGateway::completePayment()-style helpers that already include the guard.
Webhook URLs (cheat sheet)
Most gateways — including Stripe and PayPal — use a single unified webhook route: /payment/webhook/{gateway} (the gateway slug comes after webhook). Mollie and Paystack use their own gateway-specific routes. Tip: every gateway's settings panel shows its exact Webhook Endpoint URL with a Copy button, pre-filled for your site — that is always the authoritative value.
# Unified route — /payment/webhook/{gateway}
https://yoursite.com/wp-json/yatra/v1/payment/webhook/paypal
https://yoursite.com/wp-json/yatra/v1/payment/webhook/paypal-ipn
https://yoursite.com/wp-json/yatra/v1/payment/webhook/stripe
https://yoursite.com/wp-json/yatra/v1/payment/webhook/razorpay
https://yoursite.com/wp-json/yatra/v1/payment/webhook/square
https://yoursite.com/wp-json/yatra/v1/payment/webhook/authorize_net

# Gateway-specific routes
https://yoursite.com/wp-json/yatra/v1/payment/mollie/webhook
https://yoursite.com/wp-json/yatra/v1/payment/paystack/webhook
Where the routes are registered
The unified pattern is in app/Controllers/PaymentGatewayController.php (line 89): register_rest_route( …, '/payment/webhook/(?P<gateway>[a-z_]+)', … ). Gateway-specific routes (Mollie, Paystack, Stripe) are registered in their own classes — search the Pro plugin for register_rest_route to confirm.
What's next
- Email & notifications — what fires after confirmation.
- Settings → Payment — the deposit / partial / scheduled-payment field reference.
- Pro modules — every Pro feature, including Dynamic Pricing and Flexible Payments.
- Troubleshooting.